
Simplified
Simplified

Chirp: ship it

SQL → Supabase

The SQL you know, and the same query with Supabase's library.

Every query

const { data, error } = await supabase
  .from("posts")
  .select("body, likes");
if (error) throw new Error(error.message);

The rows come back as data. If Postgres refuses the query, error says why.

From Picking Columns ↗

Picking columns and rows

SELECT body, likes FROM posts;
↓Supabase's library
.from("posts").select("body, likes")
From Picking Columns ↗
SELECT * FROM posts;
↓Supabase's library
.from("posts").select("*")
From Picking Columns ↗
WHERE id = 20
↓Supabase's library
.eq("id", 20)
From Picking Rows ↗
WHERE likes > 100
↓Supabase's library
.gt("likes", 100)
From Comparing Values ↗
WHERE likes >= 100
↓Supabase's library
.gte("likes", 100)
From Comparing Values ↗
WHERE likes < 100
↓Supabase's library
.lt("likes", 100)
From Comparing Values ↗
WHERE likes <= 100
↓Supabase's library
.lte("likes", 100)
From Comparing Values ↗
WHERE likes <> 0
↓Supabase's library
.neq("likes", 0)
From Comparing Values ↗
WHERE name IS NULL
↓Supabase's library
.is("name", null)

Not .eq("name", null): like = NULL in SQL, it finds no row.

From Comparing Values ↗
WHERE name IS NOT NULL
↓Supabase's library
.not("name", "is", null)
From Comparing Values ↗
WHERE likes > 100 AND id < 10
↓Supabase's library
.gt("likes", 100).lt("id", 10)

AND is two filters, one after the other.

From Combining Conditions ↗
WHERE likes BETWEEN 50 AND 100
↓Supabase's library
.gte("likes", 50).lte("likes", 100)

BETWEEN keeps both ends, so it is >= and <=.

From Combining Conditions ↗
WHERE likes > 300 OR likes < 10
↓Supabase's library
.or("likes.gt.300,likes.lt.10")

OR takes one string: each condition as column.filter.value, split by commas.

From Combining Conditions ↗
WHERE id IN (1, 4, 20)
↓Supabase's library
.in("id", [1, 4, 20])
From Combining Conditions ↗

Matching text

WHERE body LIKE '%SQL%'
↓Supabase's library
.like("body", "%SQL%")
From Matching Text ↗
WHERE body ILIKE '%sql%'
↓Supabase's library
.ilike("body", "%sql%")

% and _ mean the same as in SQL.

From Matching Text ↗

Sorting

ORDER BY created_at
↓Supabase's library
.order("created_at")
From Sorting ↗
ORDER BY created_at DESC
↓Supabase's library
.order("created_at", { ascending: false })
From Sorting ↗
ORDER BY likes DESC, created_at
↓Supabase's library
.order("likes", { ascending: false })
.order("created_at")

The second .order() breaks ties, like the second column after the comma.

From Sorting ↗
LIMIT 10
↓Supabase's library
.limit(10)
From Sorting ↗

Counting

SELECT COUNT(*) FROM posts WHERE likes > 100;
↓Supabase's library
const { count, error } = await supabase
  .from("posts")
  .select("*", { count: "exact", head: true })
  .gt("likes", 100);

Read count, not data. head: true sends back no rows, only the number.

From Counting ↗
SELECT SUM(likes) FROM posts;
↓Supabase's library
.select("likes.sum()").single()

Comes back as data.sum. SUM, AVG and GROUP BY need two lines run once in the SQL Editor: Chirp: find and count posts, step 6.

From Counting ↗
SELECT AVG(likes) FROM posts;
↓Supabase's library
.select("likes.avg()").single()

Comes back as data.avg.

From Counting ↗
SELECT handle, COUNT(*) FROM posts
GROUP BY handle;
↓Supabase's library
.select("handle, count()")

There is no .group(). The library groups by every plain column you select.

From Counting ↗

Adding, changing and removing rows

INSERT INTO posts (body) VALUES ('Hello');
↓Supabase's library
.from("posts").insert({ body: "Hello" })

Each key is a column. Columns you leave out get their default.

From Adding Rows ↗
INSERT INTO posts (body)
VALUES ('One'), ('Two');
↓Supabase's library
.insert([{ body: "One" }, { body: "Two" }])
From Adding Rows ↗
INSERT … RETURNING id;
↓Supabase's library
.insert({ body: "Hello" })
.select("id")
.single()

The new row's id comes back as data.id.

From Adding Rows ↗
UPDATE posts SET body = 'Edited'
WHERE id = 21;
↓Supabase's library
.from("posts")
.update({ body: "Edited" })
.eq("id", 21)

The filter is your WHERE. Never leave it out.

From Changing and Removing Rows ↗
DELETE FROM posts WHERE id = 21;
↓Supabase's library
.from("posts").delete().eq("id", 21)

The filter is your WHERE. Never leave it out.

From Changing and Removing Rows ↗
DELETE FROM posts WHERE id = 21;
-- Postgres reports: DELETE 1
↓Supabase's library
const { count, error } = await supabase
  .from("posts")
  .delete({ count: "exact" })
  .eq("id", 21);

count is how many rows the write changed. update() takes it as its second argument.

From Changing and Removing Rows ↗

Across tables

SELECT posts.body, users.handle
FROM posts
JOIN users ON users.id = posts.user_id;
↓Supabase's library
.from("posts").select("body, users(handle)")

The library finds the ON from the foreign key. Each post comes back with users: { handle }.

From Reading Across Tables ↗
… JOIN users ON users.id = posts.user_id
WHERE users.handle = 'ada';
↓Supabase's library
.select("body, users!inner(handle)")
.eq("users.handle", "ada")

!inner keeps only the posts whose user passes the filter.

From Reading Across Tables ↗

When Postgres says no

ERROR: duplicate key value violates
unique constraint …
↓Supabase's library
if (error?.code === "23505") {
  // a UNIQUE column already has this value
}

error.code is Postgres's code for the error, and error.message its words.

From Why the Database Says No ↗
ERROR: … violates foreign key constraint …
↓Supabase's library
if (error?.code === "23503") {
  // a row points at a row that isn't there
}
From Why the Database Says No ↗

Only in the SQL Editor

CREATE TABLE posts ( … );
↓SQL Editor

The library reads and writes rows. Tables, indexes and their rules are made in SQL.

From The Schema ↗
CREATE INDEX ON posts (user_id);
↓SQL Editor
From Indexes ↗
EXPLAIN SELECT * FROM posts
WHERE user_id = 7;
↓SQL Editor

Shows the plan: Seq Scan reads every row, Index Scan uses an index.

From When an Index Helps ↗
BEGIN;
  …
COMMIT;
↓A Postgres function
supabase.rpc("like_post", { … })

The library has no BEGIN. Writes that must happen together go in a Postgres function, which runs as one transaction, and you call it with .rpc().

From All or Nothing ↗
UPDATE posts SET likes = likes + 1
WHERE id = 21;
↓A Postgres function

.update() sends a value, not likes + 1. To let the database do the math, write it in a function.

From When Requests Overlap ↗
ALTER TABLE users ADD COLUMN bio varchar(160);
↓A migration file
From Changing a Live Table ↗

A row appears here once a lesson has taught its SQL.

YOU

Chirp: ship it

Time
About 45 min
Steps
7
Where
Your editor

You'll need

  • •Your chirp repository, on GitHub
  • •Your Supabase project, simplified-practice
  • •Its database password, saved when you made the project
  • •A Vercel account, on the free Hobby plan

Puts into practice

  • Your own Postgres database
  • 4.2 Changing and Removing Rows
  • 8.1 Sharing a Few Connections
  • Chirp: fewer queries
  • 8.5 Changing a Live Table

Chirp's users table holds every account: you, Ada, and thousands more.

You made it by typing CREATE TABLE into Supabase's SQL Editor.

And Chirp itself runs at localhost:3000, on your computer only.

Now each profile needs a bio: a line about its person, like X has.

So how does a new column get into a table full of rows, and stay in your repository?

In this project you add it as a migration, with Supabase's command line tool.

Then you put Chirp on the internet, where anyone with its link can open it.

The goal

Chirp live on the internet, with a bio on every profile, added by a migration.
When you're done

  • ✓Every profile has a bio its owner can edit.
  • ✓The bio column was added by a migration.
  • ✓Chirp is live at a public address.

What you're working toward

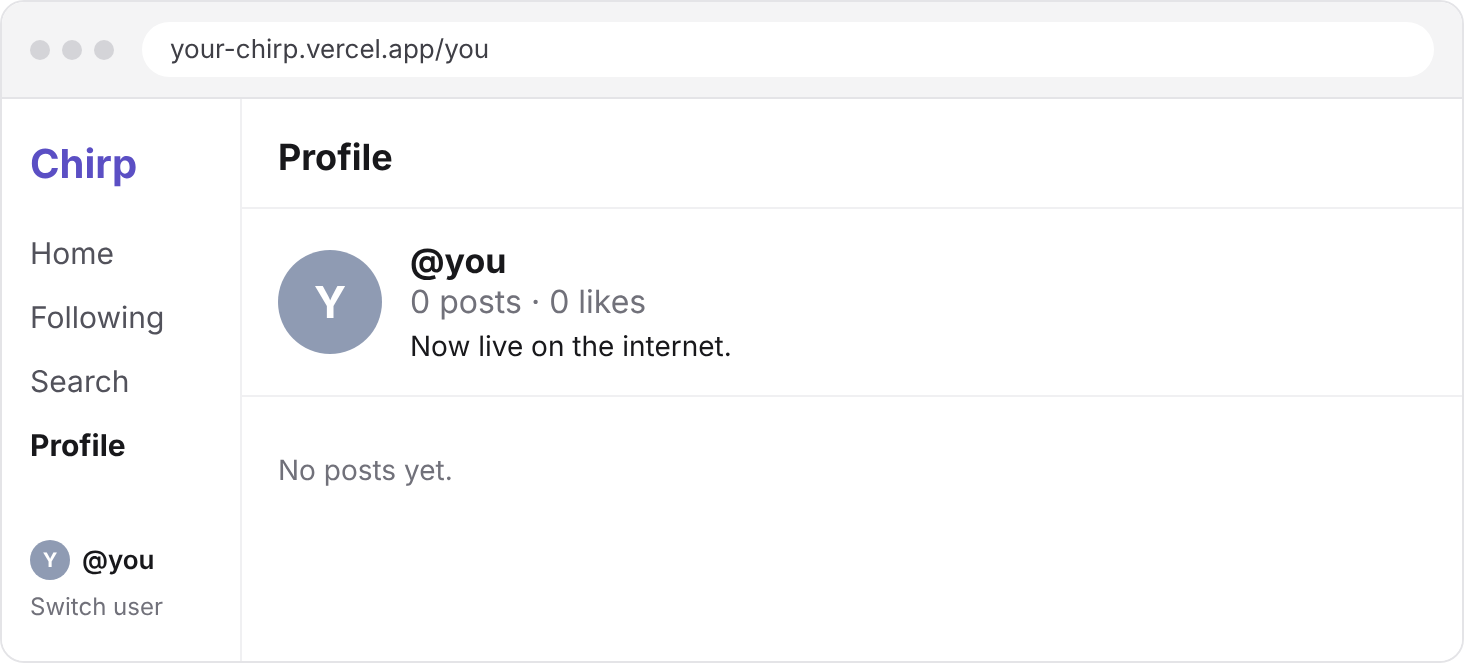
Your profile on the live Chirp, at a vercel.app address, with the bio Now live on the internet.
1

Step 1: Link your project

Supabase has a command line tool for changing your database from your terminal. In your chirp folder, install it.

npm install supabase --save-dev

Log it in to your Supabase account. It opens your browser: follow it, then come back.

npx supabase login

Then give your repository a supabase folder, where your migrations will live.

npx supabase init

Then link the folder to your project.

npx supabase link

Pick simplified-practice from the list.

It asks for your database password: the one you saved when you made the project.

Why does it need that password?

Because it opens a connection to your Postgres, and logs in, as any app server does.

You should see

Finished supabase link. in your terminal, and a new supabase folder in chirp.

2

Step 2: Your turn: write the migration

Make an empty migration file, named for its one change.

npx supabase migration new add_bio

It lands in supabase/migrations, with the date and time in front of its name, like this.

supabase/migrations/20261117093000_add_bio.sql

A later file always gets a bigger number, so the files run in order, just as 001, 002 and 003 do.

Open the file. It's empty, and the change is yours to write.

Here is the new column:

ColumnTypeRules
biovarchar(160)None: no DEFAULT

160 characters is as long as a bio on X.

Your turn 1

Write the query that adds a bio column to the users table you already have, keeping its rows. Save it in the migration file.

A right answer gives

The file holds one ALTER TABLE, ending in a semicolon.

ALTER TABLE users ADD COLUMN bio varchar(160);

You should see

Your migration file in supabase/migrations, holding your ALTER TABLE.

3

Step 3: Run it, once

Send your migration to your project's database.

npx supabase db push --remote

--remote sends it to the project you linked.

It lists your add_bio migration, and asks before it runs. Type y.

Then open the Table Editor, and pick users.

What does bio hold for Ada, and for you?

NULL: every row was saved before bio existed, and bio has no DEFAULT.

Now run the same command again.

npx supabase db push --remote

Supabase keeps a list of the migrations each database has run, inside that database.

add_bio is on it, so it doesn't run twice.

You should see

A bio column in users, NULL in every row. The second run says your linked project is up to date, and runs nothing.

4

Step 4: Your turn: show and edit the bio

A profile page, like localhost:3000/you, shows a bio under the name, from getUser(handle).

getUser still returns sample data.

And Settings has a Bio box, whose Save button calls updateBio(userId, bio), which saves nothing yet.

Your turn 1

Make getUser(handle) send back that person's id, handle, name and bio.

Done when

localhost:3000/you and localhost:3000/ada load as before, with no bio and no sample data tag.

// SELECT id, handle, name, bio FROM users WHERE handle = 'you';
export async function getUser(handle: string) {
  const { data, error } = await supabase
    .from("users")
    .select("id, handle, name, bio")
    .eq("handle", handle)
    .single();
  if (error) throw new Error(error.message);
  return data;
}

Your turn 2

Make updateBio(userId, bio) save that bio in that user's row, and no one else's.

Done when

Save Learning databases, one checkpoint at a time. in Settings, and it shows under your name at localhost:3000/you. Ada's profile still has none.

// UPDATE users SET bio = 'Learning databases, one checkpoint at a time.' WHERE id = 7;
export async function updateBio(userId: number, bio: string) {
  const { error } = await supabase
    .from("users")
    .update({ bio })
    .eq("id", userId);
  if (error) throw new Error(error.message);
}

You should see

Your bio under your name on your profile, and in the Table Editor, in your row only.
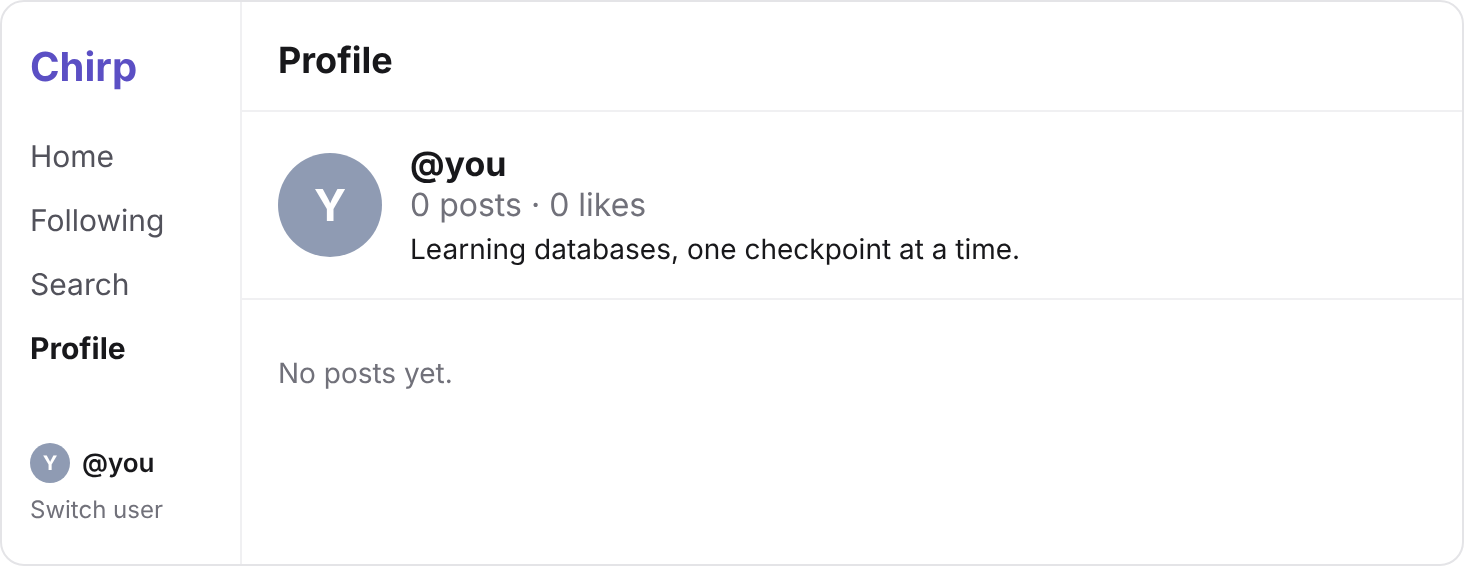
Your profile at localhost:3000/you, with the bio Learning databases, one checkpoint at a time., and no posts yet.
5

Step 5: Save your work

Commit your code and the supabase folder, with your migration in it.

git add -A
git commit -m "Add a bio to profiles, as a migration"
git push

A teammate now reads your schema change in GitHub, like any code.

You should see

Your commit on GitHub, with supabase/migrations and your add_bio file in it, and no .env.local.

6

Step 6: Put Chirp on the internet

Vercel runs Next.js apps on its servers, for free on its Hobby plan.

Sign up at vercel.com with your GitHub account, on the Hobby plan.

Start a new project, and import your chirp repository from GitHub.

Before you deploy, open Environment Variables, and add two.

SUPABASE_URL
SUPABASE_SECRET_KEY

Give each the same value as in your .env.local. Make the secret key a Secret.

Why type them in again?

Because .env.local never went to GitHub, so Vercel can't read it.

Vercel keeps them, and hands them to your server code only.

Then press Deploy, and wait for the build to finish.

Chirp has no login, so anyone with its link acts as you. Share it only with people you trust.

You should see

Your Chirp at its own address, ending in .vercel.app, with the same feed as localhost:3000.

7

Step 7: Change it from the internet

On your live Chirp, open Settings, and save a new bio: Now live on the internet.

Then open localhost:3000/you on your computer.

Why does it show the bio you just saved on the internet?

Because both servers send their queries to the same Postgres database, your simplified-practice.

You should see

Now live on the internet. on your live profile, and on localhost:3000/you too.

Your profile on the live Chirp, at a vercel.app address, with the bio Now live on the internet.

npx supabase link doesn't list simplified-practice

You logged in to a different Supabase account. Run npx supabase login again, with the account that has the project.

I lost my database password

Reset it in your project's database settings, then run npx supabase link again with the new one.

db push says the bio column already exists

You added bio in the SQL Editor before, so the migration can't add it again. Run ALTER TABLE users DROP COLUMN bio; there, which removes the column and what it holds, then push again.

An error that says column users.bio does not exist

Your migration hasn't run on this database. Run npx supabase db push --remote, then reload.

An error that says value too long for type character varying(160)

Your bio is over 160 characters, so Postgres refuses it. Make it shorter.

The live site shows an error, but localhost:3000 works

A variable is missing or misspelt on Vercel. Fix it in the project's settings, then deploy again, because a change only reaches a new deployment.

Supabase says your project is paused

Free projects pause after a week with no activity. Press Restore project on its page, and wait a few minutes: your live Chirp needs it too.

Finish the project

Tick every step once you've seen what it says you should see. Then mark the project complete to unlock the next lesson.

0 of 7 steps done
Assistant

Highlight lesson text and click Ask AI, or type a question below.